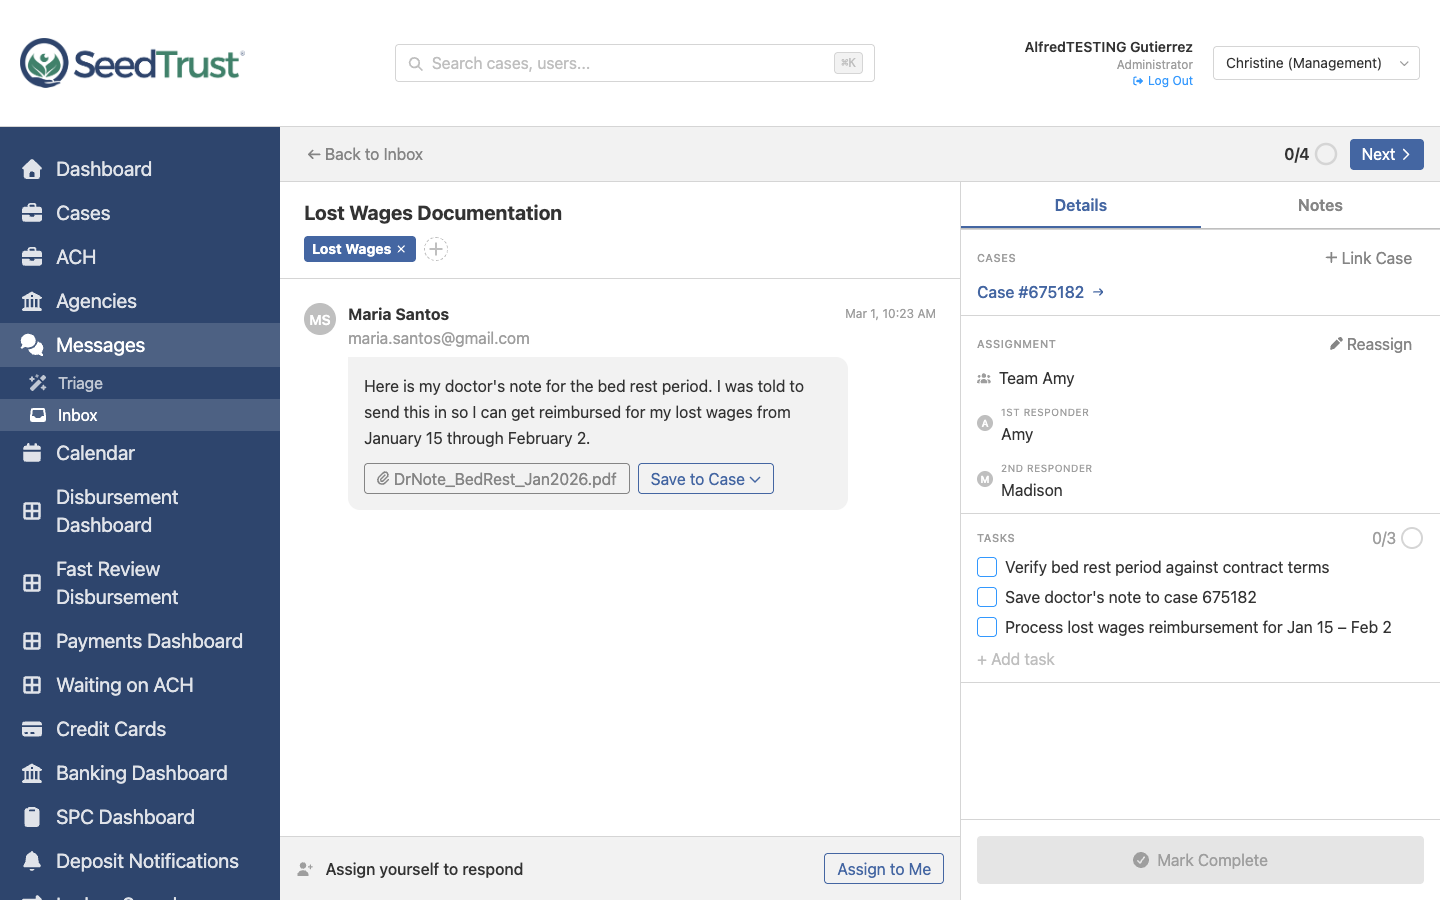
Communications Detail
The detail page shows a single conversation with everything needed to read, respond, and resolve it.
Layout
Section titled “Layout”The page has three vertical sections:
- Navigation strip — top bar with Back, Prev/Next arrows, and position indicator
- Message thread — left column with the full conversation
- Action panel — right sidebar (480px) with case info, tasks, notes, and assignment
Navigation Strip
Section titled “Navigation Strip”The strip at the top provides queue navigation without returning to the list:
- Back to Inbox — returns to the list page
- Prev arrow — moves to the previous conversation (disabled when at position 1)
- Position counter — large “1/4” text displayed to the left of a small circular progress ring
- Next button — a prominent blue filled button with right chevron that advances to the next conversation
The progress ring fills proportionally — at position 6 of 8, it’s 75% filled. The counter and ring provide ambient progress awareness while the bold Next button encourages continuous queue flow.
Message Thread
Section titled “Message Thread”Messages display as bubbles with visual distinction by direction:
Inbound Messages (from client)
Section titled “Inbound Messages (from client)”- Left-aligned with light background
- Header shows: agency badge icon + organization name (right-aligned timestamp)
- Second line: sender name and email
- Full message body below
Outbound Messages (from staff)
Section titled “Outbound Messages (from staff)”- Right-aligned with blue-tinted background
- Header shows: staff name + timestamp
- Full message body below
Internal Notes
Section titled “Internal Notes”- Centered with amber/yellow background and dashed border
- Marked with a note icon
- Visible only to internal staff — never sent to the client
- @mentions render as blue highlighted text (e.g., @Christine)
All message types display chronologically in a single thread, interleaving inbound, outbound, and notes by timestamp.
Attachments
Section titled “Attachments”Inbound messages may include attachments. Each attachment shows a file button with the filename and a “Save to Case” dropdown with document type categories.
Save to Case Flow
Section titled “Save to Case Flow”- Click “Save to Case” and select a document type (Medical Records, Legal Documents, Financial Statements, etc.)
- An inline section appears below the attachment:
- If the conversation already has a linked case, the case name displays automatically
- If no case is linked, a searchable case combobox appears so the user can select one
- A rename field appears pre-filled with the original filename — the user can edit it before saving
- Click Save to file the document (disabled until a case is selected), or Cancel to dismiss
- Saved attachments show a green “Saved” badge with the renamed filename
This flow works identically in both the Communications inbox and the Triage queue.
Self-Assignment Gate
Section titled “Self-Assignment Gate”Before a team member can reply, they must assign themselves to the conversation. If the user is not yet assigned, the reply composer is replaced with an assignment bar showing an “Assign to Me” button.
This ensures every response has a named owner for accountability.
Reply Composer
Section titled “Reply Composer”Once assigned, the composer appears at the bottom of the thread:
- Textarea — full-width text input for composing replies
- Template picker — searchable dropdown with pre-built response templates (personal templates marked with a home icon, team templates with a flag)
- Save as Template — save the current draft as a reusable template
- Attach files — add file attachments to the reply
- Send button — a split button with the primary action separated from the dropdown chevron:
- Send (primary click) — sends the reply, keeps conversation in inbox
- Send & Follow Up (dropdown) — sends the reply and marks as follow-up
Reply Templates
Section titled “Reply Templates”Pre-built templates cover common scenarios:
| Template | Use Case |
|---|---|
| Payment Status Update | Informing about payment processing |
| Document Request | Asking for additional documentation |
| Acknowledgment | Confirming receipt of information |
| Escalation Response | Letting client know the issue was escalated |
| Follow-Up Needed | Requesting additional information |
| Case Resolution | Confirming issue resolution |
Custom templates can be saved from any reply draft.
Action Panel
Section titled “Action Panel”The right sidebar has two tabs:
Details Tab
Section titled “Details Tab”- Cases — linked escrow cases (clickable to open Case Drawer). If no cases are linked, shows “No cases linked” with a Link Case button. Clicking it opens a searchable case combobox inline, with a Cancel option. The Link Case button matches the style of the Reassign button for visual consistency.
- Assignment — current team (with team icon), 1st responder, 2nd responder, with a Reassign button
- Tasks — AI-suggested checklist items that must be completed before marking the conversation done
Notes Tab
Section titled “Notes Tab”- Note composer — textarea with @mention support (type
@to see team member dropdown) - Notes list — all internal notes sorted newest-first, showing author avatar, name, timestamp, and body
- The tab label shows the count of existing notes: “Notes (3)“
@Mentions
Section titled “@Mentions”Typing @ in the notes composer opens a filtered dropdown of team members. As you type, the list narrows. Selecting a name inserts @Name into the note.
When a note containing @Christine is saved:
- It appears in Christine’s “Mentions” tab on the list page
- The mention count on the tab increments
- Christine can click through to see the full conversation context
Mark Complete
Section titled “Mark Complete”A “Mark Complete” button sits at the bottom of the action panel. It is disabled until all tasks are checked off — preventing premature closure of conversations that still have outstanding action items.
When marked complete:
- The “handled today” counter increments
- The view auto-advances to the next conversation in the queue (after 500ms)
- If no conversations remain, an “All caught up!” screen appears briefly before returning to the list
Case Drawer
Section titled “Case Drawer”Clicking a linked case opens a 480px slide-out drawer with:
- Case parties (IP, GC, Agency)
- Financial summary (balance, total deposits, total disbursements)
- Key dates (contract signed, transfer date, due date)
The drawer overlays the current view — the conversation stays visible underneath.
Reassign Modal
Section titled “Reassign Modal”Clicking “Reassign” opens a modal with:
- Team dropdown
- 1st Responder dropdown (filtered by selected team)
- 2nd Responder dropdown
Selecting a new team and person and clicking “Reassign” immediately transfers ownership.